Blog Post
9 Essential Steps for a Seamless Website Migration Project
September 22, 2025
Table Of Content
Website migration can feel overwhelming, but with the right approach, you can move your site without losing traffic, rankings, or functionality. Whether you're switching hosting providers, changing domains, or upgrading your platform, following these nine proven steps will ensure your website migration goes smoothly and protects your hard-earned SEO progress.
What Is Website Migration and Why Does It Matter?
Website migration involves moving your website from one environment to another. This could mean changing web hosts, switching to a new domain name, upgrading your content management system, or implementing a complete redesign.
Each type of migration comes with unique challenges, but they all share one critical requirement: maintaining your website's performance and search engine visibility.
The stakes are high. Poor website migration can result in broken links, lost content, plummeting search rankings, and frustrated users. However, when executed properly, migration can improve your site's performance, security, and user experience while preserving your SEO equity.
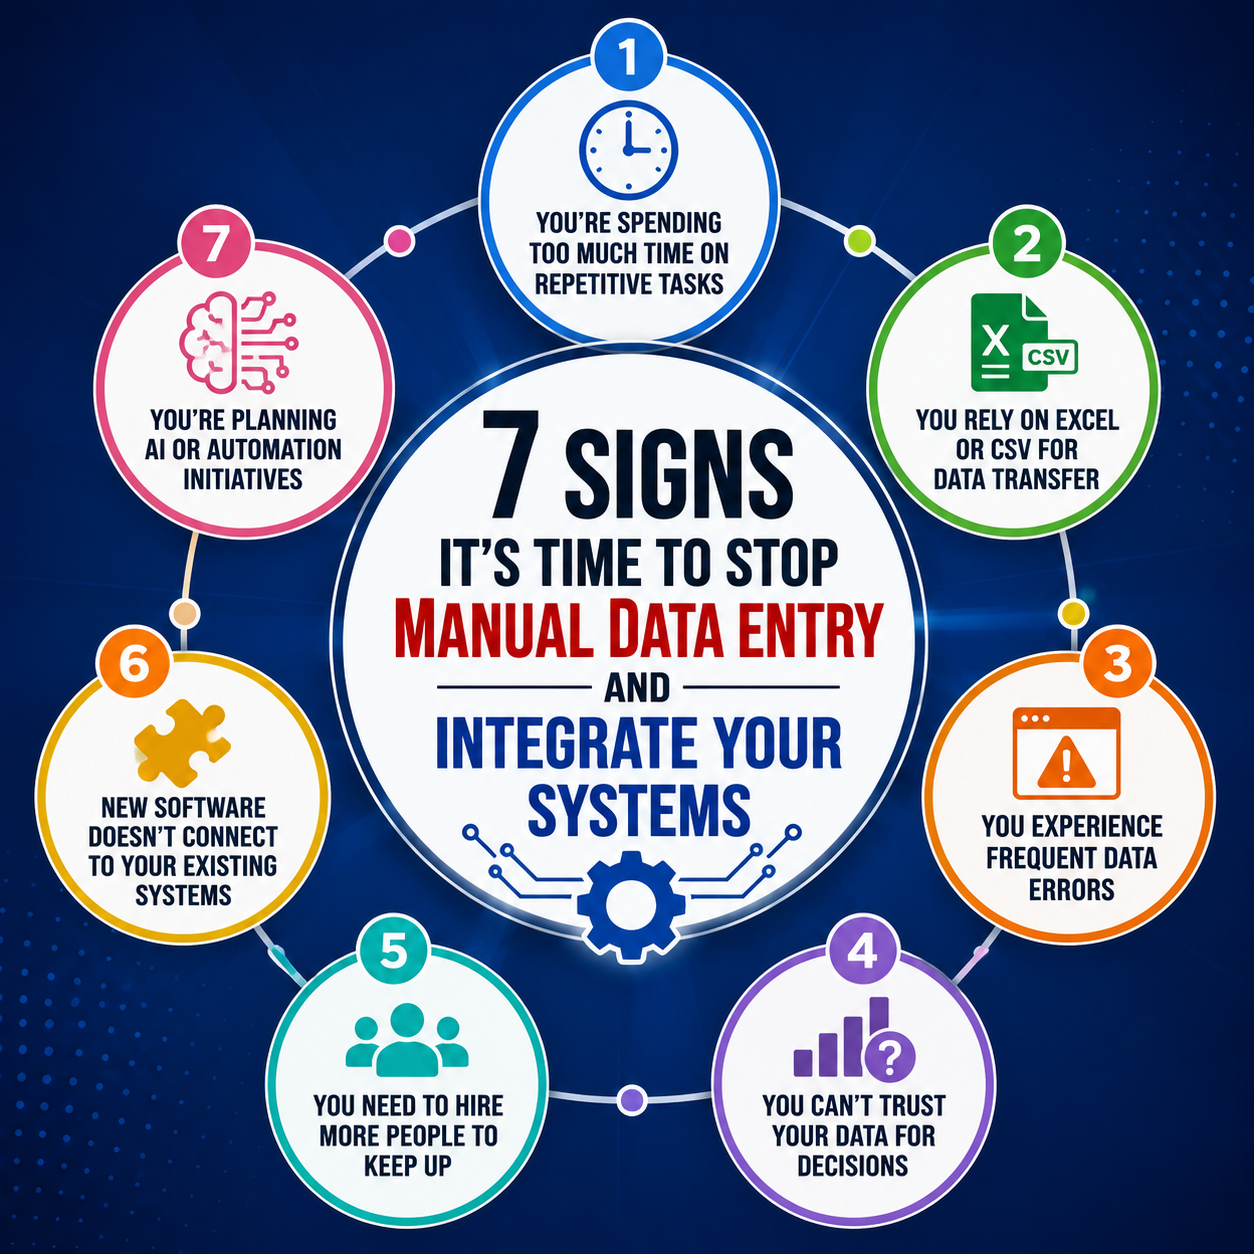
What is the first step in any website migration project?

The first step in any website migration project is conducting a comprehensive pre-migration planning and audit. This critical foundation involves documenting your entire website's structure, content, functionality, and technical configurations before making any changes.
You need to create a complete inventory of all pages, subdomains, media files, custom scripts, plugins, and integrations, while also cataloging your SEO assets like meta tags, sitemaps, and ranking pages.
This audit serves as your migration roadmap, ensuring nothing gets lost during the transition and providing a clear baseline to measure success against.
Let’s dive deep into the essential steps for a seamless website migration project.
Step 1: Pre-Migration Planning and Audit
Before touching a single file, conduct a comprehensive audit of your current website. This foundation step is crucial for a successful website migration process.

Complete Site Inventory:
- Document all pages, including hidden or archived content
- List all subdomains and microsites
- Identify dynamic URLs and database-driven content
- Catalog all media files, documents, and downloadable resources
SEO Asset Documentation:
- Export your current sitemap
- Record meta titles, descriptions, and header tags for key pages
- Document your current backlink profile using tools like Google Search Console
- Note your top-performing keywords and ranking pages
Technical Assessment:
- Identify custom scripts, plugins, and third-party integrations
- Document server configurations and special requirements
- List all forms, e-commerce functionality, and interactive elements
- Review current website performance metrics
This audit serves as your migration roadmap and helps ensure nothing gets lost in the transition. For businesses with complex technical requirements or custom enterprise solutions, partnering with experienced software development teams can streamline this assessment process and identify potential challenges before they impact your migration timeline.
Step 2: Choose the Right Timing
Timing can make or break your website migration. Strategic planning around when to migrate minimizes potential traffic loss and user disruption. That's where Spire Soft steps in.
Traffic Pattern Analysis:
- Use Google Analytics to identify your lowest traffic days and hours
- Consider seasonal trends in your industry
- Avoid major holidays, product launches, or marketing campaigns
- Plan around your team's availability for immediate issue resolution
Business Considerations:
- Coordinate with sales and marketing teams
- Ensure customer service is prepared for potential inquiries
- Plan for extended monitoring period post-migration
- Allow buffer time for unexpected issues
Most successful migrations happen during weekends or late evenings when traffic is naturally lower, giving you time to address any issues before peak hours return.
Step 3: Create a Complete Backup
Never start a website migration project without comprehensive backups. This safety net is your insurance policy against data loss or migration failures.
Essential Backup Components:
- Full file system backup: Every file, folder, and directory
- Complete database export: All data, user accounts, and configurations
- DNS zone file backup: Current domain settings and records
- Email accounts and settings: If hosted on the same server
- SSL certificates and security configurations
Best Practices for Backups:
- Store backups in multiple locations (local, cloud, and offline)
- Test backup integrity before starting migration
- Document backup procedures for your team
- Keep backups for at least 30 days post-migration
Consider creating incremental backups during the migration process to capture any last-minute changes or content updates.
Step 4: Set Up Your New Environment
Your new hosting environment needs to be properly configured before migration begins. This step ensures compatibility and optimal performance from day one.
New Server Setup:
- Install required software versions (PHP, databases, etc.)
- Configure server settings to match or exceed current performance
- Set up SSL certificates for secure connections
- Install necessary plugins, extensions, or custom software
Staging Environment Creation:
- Create an exact replica of your production environment
- Use a temporary subdomain or password-protected directory
- Ensure staging has identical configurations to production
- Set up testing accounts and sample data
Security Implementation:
- Configure firewalls and security protocols
- Set up automated backup systems
- Implement monitoring and logging systems
- Test security measures thoroughly
A properly configured environment prevents many common website migration project issues and ensures your site performs optimally from launch.
Step 5: Migrate and Test Content after website migration project
Content migration is where your careful planning pays off. Systematic content transfer ensures nothing gets lost and everything functions correctly.
Content Transfer Process:
- Migrate content in logical sections (homepage, main pages, blog posts, etc.)
- Preserve file structures and naming conventions when possible
- Maintain image optimization and alt text
- Transfer user accounts and permissions carefully
Functionality Testing:
- Test all forms and ensure they submit correctly
- Verify e-commerce functionality (shopping carts, payment processing)
- Check interactive elements like calculators or tools
- Test user registration and login systems
- Verify email notifications and automated systems
Content Quality Assurance:
- Review formatting and layout on different devices
- Check internal links and navigation menus
- Verify media files display correctly
- Test download links and file accessibility
Use a systematic checklist by Spire Soft to ensure every element is tested before proceeding to the next migration phase.
Step 6: Implement SEO Preservation Strategies
Protecting your search engine rankings during migration requires careful attention to SEO elements and proper redirect implementation.
URL Structure and Redirects:
- Create comprehensive 301 redirect mapping for changed URLs
- Preserve URL structure whenever possible to minimize redirects
- Use server-level redirects rather than meta refreshes
- Test redirects thoroughly using tools like Screaming Frog
SEO Element Transfer:
- Preserve existing meta titles and descriptions for ranking pages
- Maintain header tag structure (H1, H2, H3)
- Transfer schema markup and structured data
- Keep internal linking structure intact
- Preserve image alt text and file names
Technical SEO Considerations:
- Update XML sitemaps with new URLs
- Ensure robots.txt file is properly configured
- Implement canonical tags where appropriate
- Maintain page loading speeds and Core Web Vitals scores
Search Engine Communication:
- Submit updated sitemaps to Google Search Console
- Use the Change of Address tool if changing domains
- Monitor crawl errors and fix them promptly
- Consider temporary crawl rate adjustments
Step 7: DNS Changes and Go-Live
The moment of truth arrives when you point your domain to the new server. Proper DNS management ensures a smooth transition with minimal downtime.
Pre-DNS Checklist:
- Lower TTL (Time To Live) values 24-48 hours before migration
- Confirm all testing is complete on staging environment
- Prepare rollback plan in case of critical issues
- Notify team members of go-live timing
DNS Update Process:
- Update A records to point to new server IP
- Modify CNAME records for subdomains if necessary
- Update MX records if email hosting changes
- Configure any CDN or third-party service records
Monitoring DNS Propagation:
- Use DNS propagation checkers to monitor global updates
- Test site access from multiple geographic locations
- Keep old hosting active during propagation period
- Monitor for any DNS-related issues
DNS propagation typically takes 24-48 hours globally, though most users will see changes within a few hours.
Step 8: Post-Migration Testing and Monitoring
Once your site is live, intensive monitoring and testing ensure everything functions correctly and performance remains optimal.
Immediate Testing Priorities:
- Complete functionality test of all site features
- Check all forms and interactive elements
- Verify e-commerce processes end-to-end
- Test user registration and login processes
- Confirm email notifications are working
Performance Monitoring:
- Check page loading speeds using Google PageSpeed Insights
- Monitor Core Web Vitals metrics
- Test mobile responsiveness across devices
- Verify CDN and caching systems are working
- Monitor server response times and uptime
SEO and Analytics Verification:
- Confirm Google Analytics tracking is working
- Verify Google Search Console is receiving data
- Check that conversion tracking is functioning
- Monitor for crawl errors and 404 pages
- Test social media sharing functionality
User Experience Testing:
- Navigate through critical user journeys
- Test checkout processes and lead generation forms
- Verify contact information and business hours are correct
- Check that all legal pages (privacy policy, terms) are accessible
Step 9: Post-Launch Optimization and Follow-Up
Website migration success extends beyond the initial launch. Ongoing monitoring and optimization ensure long-term success and help identify any lingering issues.
Short-Term Monitoring (First 2 Weeks):
- Daily traffic and ranking monitoring
- Quick resolution of any discovered broken links
- Response to user feedback and reported issues
- Fine-tuning of performance and security settings
Long-Term Optimization (First 3 Months):
- Monthly SEO performance reviews
- Regular backup system checks
- Ongoing performance optimization
- User experience improvements based on data
Documentation and Learning:
- Document any issues encountered and solutions implemented
- Update migration procedures based on lessons learned
- Create maintenance schedules for ongoing site health
- Train team members on new systems and processes
External Updates:
- Update business listings with any URL changes
- Notify partners and affiliates of migration completion
- Update social media profiles and marketing materials
- Request backlink updates from high-value linking domains
Common Website Migration Challenges and Solutions
Even with careful planning, migrations can encounter unexpected issues. Here are solutions to common problems:
Traffic Drops: Usually temporary and related to search engine re-indexing. Monitor for 2-4 weeks before taking corrective action.
Broken Functionality: Often caused by plugin incompatibilities or server configuration differences. Test thoroughly in staging first.
Email Issues: Frequently overlooked during migration. Verify MX records and test email delivery immediately after DNS changes.
Performance Problems: May indicate server resource issues or inefficient configurations. Monitor and optimize based on real user data. If performance issues persist, consulting with experienced developers who specialize in system optimization can help identify and resolve underlying problems quickly.
When to Consider Professional Migration Services
While these steps enable many website owners to handle migrations independently, certain situations warrant professional assistance:
- Complex e-commerce sites with extensive product catalogs
- Large enterprise websites with multiple integrations
- Mission-critical sites where downtime must be minimized
- Migrations involving significant technical architecture changes
- Sites with complex custom development or legacy systems
Professional migration services bring specialized tools, experience with edge cases, and dedicated resources to ensure success. Companies like Spire Soft, with over 15 years of expertise in enterprise software development, offer comprehensive migration solutions that minimize risk and ensure seamless transitions for businesses across healthcare, legal, and educational sectors.

Essential Website Migration Tools
Several tools can streamline your migration process:
Backup and Migration:
- UpdraftPlus (WordPress)
- All-in-One WP Migration
- cPanel backup tools
- Custom migration scripts
Testing and Monitoring:
- Google Search Console
- Screaming Frog SEO Spider
- GTmetrix for performance testing
- Pingdom for uptime monitoring
SEO and Analytics:
- Google Analytics
- SEMrush or Ahrefs for ranking monitoring
- Redirect mapping tools
- XML sitemap generators
Conclusion:
Successful website migration requires careful planning, systematic execution, and ongoing monitoring. By following these nine steps, you'll preserve your SEO rankings, maintain functionality, and potentially improve your site's performance in the process.
Remember that website migration is not just a technical process—it's a strategic opportunity to enhance your online presence. Take time to plan thoroughly, test extensively, and monitor closely. With patience and attention to detail, your migration will strengthen rather than compromise your digital presence.
The key to seamless website migration lies in preparation and systematic execution. Start planning early, backup everything, test thoroughly, and don't rush the process. Your website—and your users—will thank you for the careful attention to detail.
For businesses requiring enterprise-level migration support or those managing complex custom systems, consider partnering with experienced development teams like Spire Soft, who bring 15+ years of expertise in delivering scalable, reliable solutions across various industries. Their proven track record with enterprise software and system integrations ensures your migration is handled with the precision and care your business deserves.
Ready to migrate your website?
Whether you're tackling the migration yourself or seeking professional assistance, start with thorough planning and systematic execution. With the right approach, your website migration can be a smooth, successful transition that sets your site up for future growth and success.
Book a free consultation on website migration.
FAQs on Website Migration
1. What is a website migration?
It’s the process of moving a website to a new host, domain, CMS, or design while keeping SEO and functionality intact.
2. What is the first step in a website migration project?
A complete pre-migration audit—documenting all pages, content, URLs, and SEO assets.
3. How long does website migration take?
Website migration usually takes a few hours to a day for small sites and several days or weeks for large websites.
4. Will migration affect SEO rankings?
Yes, if poorly handled. With proper redirects and SEO checks, rankings can be preserved. Spire Soft is the best choice to handle migration.
5. How can Spire Soft help with website migration?
Spire Soft provides end-to-end migration services—planning, execution, SEO preservation, and post-launch optimization.
6. When is the best time to migrate a website?
The best time to migrate a website is during low-traffic periods like weekends or late nights.
7. Why choose Spire Soft for complex migrations?
With 15+ years in enterprise software and system integrations, Spire Soft ensures smooth, secure migrations with minimal downtime.